[ZYNQ] Decrypting Partition by the Decrypt Agent Using PUF key
The Xilinx Linux Kernel decrypting design has a flaw in that the AES key exists in the partition’s secure header in plaintext form when the image is generated by multi-stages. To enhance the partition secure feature, we designed the decrypt_agent (DA) app based on the cortex-r5 CPU. The cortex-r5 decrypt_agent locks steps with a cortex-a53 CPU that normally boots the images of BOOT.bin. The cortex-r5 decrypt_agent decrypts the encrypted Linux kernel synchronously when the cortex-a53 nearly boots to the TF-A bl31.bin. The cortex-r5 writes the decrypted Linux kernel to the DRAM for the cortex-a53 to boot it with U-Boot.
1. Decrypt Agent (DA) High-Level Design
1.1 Architecture design
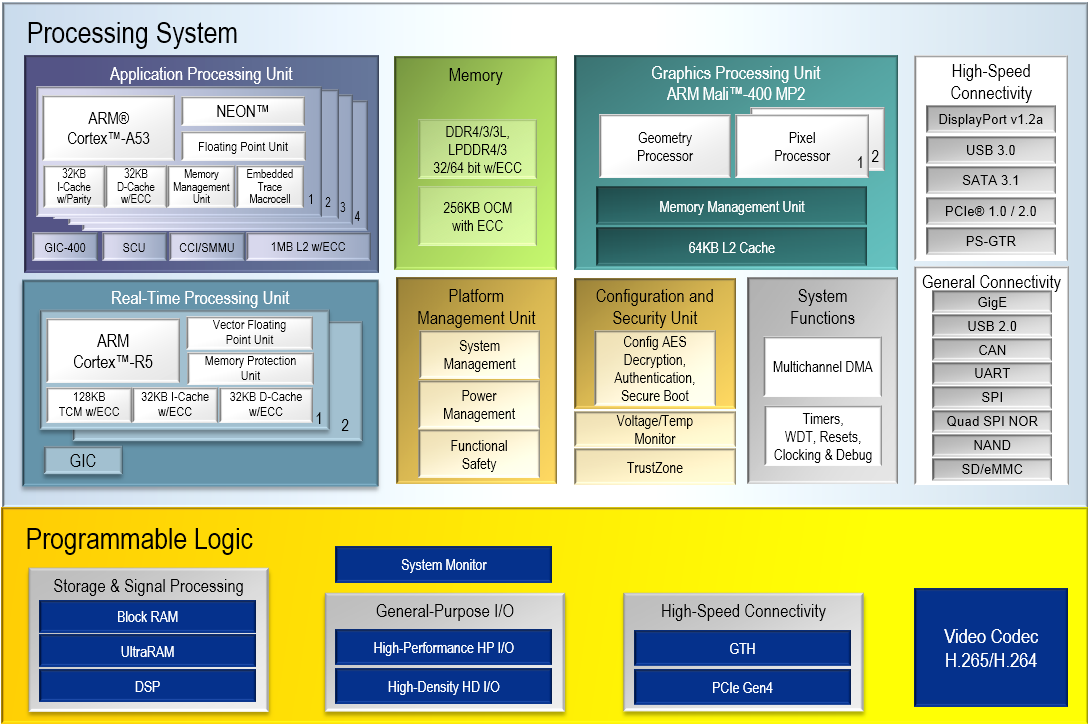
The DA is a bare-metal app for the Zynq UltraScale+ MPSoC’s cortex-r5f. There are 6 cores for the Zynq UltraScale+ MPSoC, which are quad ARM Cortex-A53 and dual Arm Cortex-R5F. Normally, the boot process is handled by the ARM Cortex-A53-0 core, while other cores are dormant. Our DA running on cortex-r5f-0 will be synchronized with the Cortex-A53-0 core to decrypt the Linux kernel, and the cortex-a53-0 is unaware of the cortex-r5f running.
The architecture hierarchy diagram of the DA is as follows:
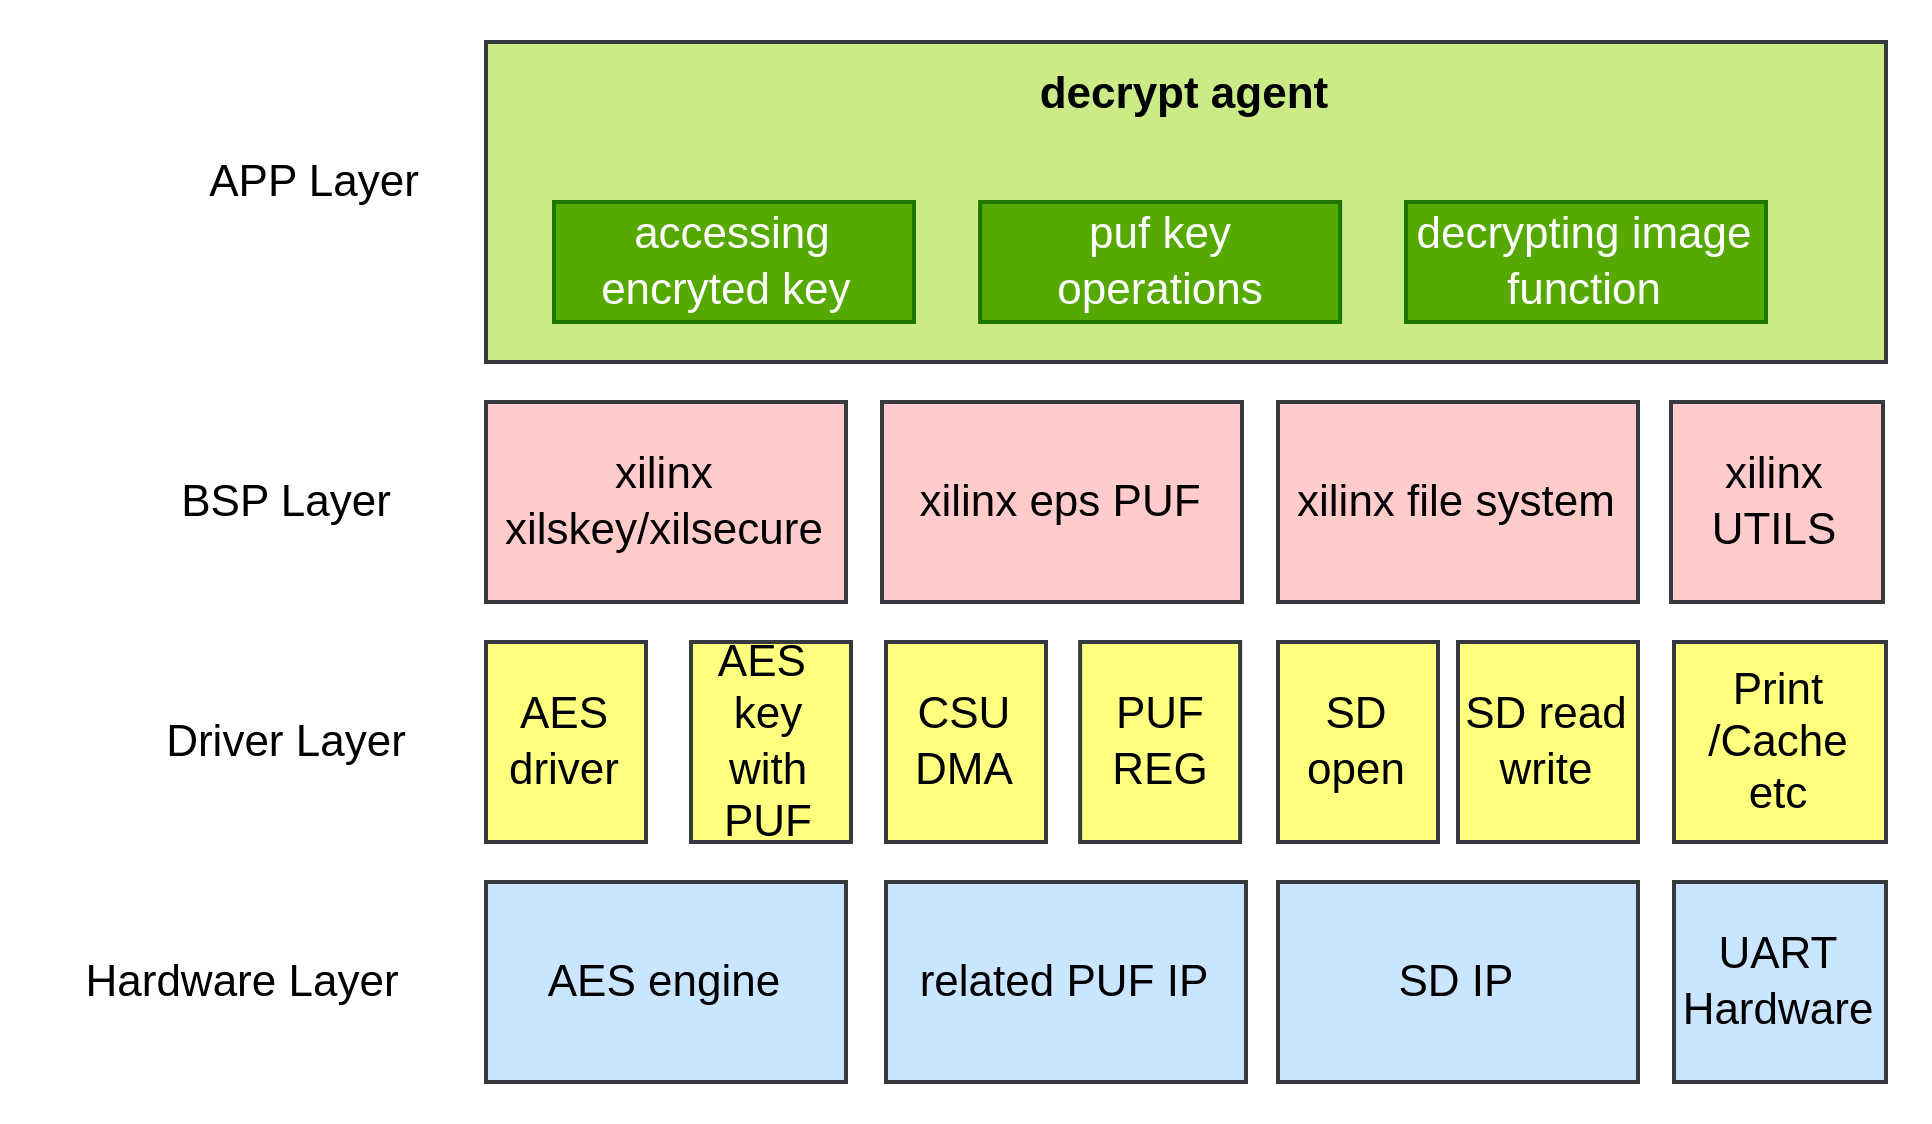
The DA, as a cortex-r5f bare-mental app, makes use of the Xilinx-provided BSP. They are:
Xilskey: The XilSKey library provides APIs for programming and reading eFUSE bits and for programming the battery-backed RAM (BBRAM).
Xilsecure: The XilSecure library provides APIs to access hardened cryptography engines.
eps PUF: The eps PUF contains APIs for operating the PUF.
file system: The LibXil fat file system (FFS) library consists of a file system and a glue layer. This FAT file system can be used with an interface supported in the glue layer.
utils: The utils provide some cache operations and logging functions.
The BSP layer makes use of the hardware driver layer. No specific introduction will be given because it is unrelated to this wiki. The source code can be obtained from the Xilinx BSPStandalone Board Support Package (BSP).

It is interpreted as follows:
The DA will load the encrypted Linux kernel from DDR (DRAM) that is written by the core Cortex-A53-0. So the lock-step with Cortex-A53 before the loading kernel is mandatory.
The DA will load the PUF encrypted key from the SD card that is written the SD card by the provisioning process. You can get this process by [ZYNQ] Secure Features Guideline | Creating provisioning image.
The DA will register the PUF function to re-generate the PUF key using the PUF helper data. Then use the PUF key to decrypt the key from the SD card. About how to re-generate the PUF key using the PUF helper data, please refer to the [ZYNQ] bring-up CaSH/TaHoe with secure boot guide | Stage 1 Enabling the PUF KEK (black key)
The DA will get the image red key that is for decrypting the encrypted Linux kernel.
The DA will write decrypted Linux kernel to the DRAM and flush the D-Cache to maintain the cache coherence between the multi-cores. For the problem of cache coherence, please refer to Section 2.1.1 Cache coherence.
The Cortex-R5 will then join the sleeping status after cleaning the DRAM/OCM.
1.3 Lock-step with Cortex-A53
Cortex-R5F processors support lock-step operation mode, which operates both RPU CPU cores as a redundant CPU configuration called safety mode.” The test case for the cortex-r5 lock-stepping with the cortex-a53 can be netted in Boot and Configuration — Embedded Design Tutorials 2022.1 documentation. In the nutshell, the Cortex-R5F (RPU) and Cortex-A53 (APU) can be performed concurrently.
The process of the Cortex-R5F lock-stepping with the APU cortex-a53 is depicted as follows:

The cortex-a53 executes the boot process according to the normal task logic, which is booting TF-A and loading the Linux kernel to DRAM via uboot. Synchronously, the RPU cortex-r5 executes the DA app. If the APU cortex-a53 has loaded the encrypted Linux kernel to DRAM, the RPU cortex-r5 would decrypt the Linux kernel using the Xilinx AES library and return the decrypted data to the DRAM that can be accessed by the APU cortex-a53. Land up the process, the U-Boot of the APU cortex-a53 can boot this decrypted Linux kernel. The timeline is shown in the following figure:

1.4 Key Management
We describe the trend of the key in three stages:
The stage of the gen_boot_image
The stage of the provisioning
The stage of the DA
1.4.1 Gen boot image
The Linux Kernel file (named image.ub in the gen_boot_image script) is encrypted by the gen_boot_image script. The core code gen_boot_image.sh can be obtained by the repo link https://code.autox.ds/security/onboard/-/tree/master/zynq/secure_boot/tools/zynq-bootgen-with-signserver. You can refer to the README to learn how to encrypt images. Simplify Linux, as shown in the figure:

The image-red key can be used to encrypt the Linux kernel.
1.4.2 The provisioning
The encrypted image key is encrypted by the PUF key that is unique on each device. The provisioning process will write the encrypted image key to the SD card. Even if this key can be read from the SD card, it has no meaning for the reader.

1.4.3 The DA stage
The DA will drive the file system library to read the encrypted image key from the SD card. Then make use of the PUF key to decrypt the key as the image red key. Furthermore, the image red key is utilized to decrypt the Linux kernel.

Note that, for security reasons, the image red key should be stored in the on-chip RAM rather than the external DRAM.
1.5 Packing into BOOT.bin
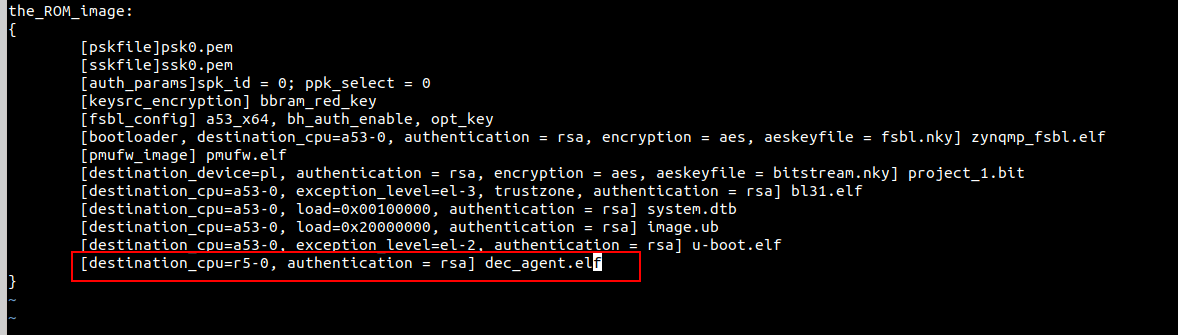
BOOT.bin contains DA as a separate partition. Xilinx’s FSBL can load the DA partition from the BOOT.bin and detect the DA’s destination CPU is cortex-r5, then boots the DA with cortex-r5. The bif file is shown in the following screenshot:
2. Decrypt Agent (DA) Low-Level Design
We divided the DA into three sub-functions: accessing the encrypted key, performing PUF key operations, and decrypting the Linux kernel. In addition, the key technologies will also be introduced in this section.
2.1 Key technologies
2.1.1 Cache coherence
Cache coherency is a situation where multiple processor cores share the same memory hierarchy, but have their own L1 data and instruction caches. Incorrect execution could occur if two or more copies of a given cache block exist in two processors' caches and one of these blocks is modified.
We make use of two processors APU and RPU, so the cache coherence problem shall be caught.

Suppose the left CPUs cluster is the APU and the right CPUs cluster is the RPU in our design. The APU and RPU have an individual L1 data cache. When we wrote the data to the memory, this data may be stored in the cache. So we need to flush the cache data to the external DDR (main RAM). For the cache coherence problem on the Zynq UltraScale+ MPSoC, please refer to the Zynq UltraScale MPSoC Cache Coherency
In bare-mental software development, the Xil_DCacheFlushRange function is in the xil_cache.h. By using the API, the cache data can be flushed to the main RAM.
2.1.2 Store the red key in the OCM
The address map in the Zynq UltraScale+ MPSoC is composed by a hierarchy of inclusive map addresses. The On-Chip Memory (OCM) is the RAM used by the First Stage Bootloader (FSBL), which must be small enough to fit into the available 256 KB. After the boot process has finished, we can use the low latency OCM in order to share information between processors. The Zynq MPSoC’s address map can be referred to Mpsoc address map · Wiki · Projects / SoC Course with Reference Designs and Documentation Portal.

The on-chip SRAM, termed "Scratch-Pad memory,",” refers to data memory residing on-chip that is mapped into an address space disjoint from the off-chip memory (DRAM) but connected to the same address and data buses. Therefore, the OCM can be read by U-Boot (APU) or the DA (RPU). When the DA decrypted the image red key using the PUF key, the red should be stored in the OCM to guarantee security.
2.2 Sub-functions
2.2.1 Accessing the encrypted key
The provisioning process will write the unique encrypted image key to the SD card for each device. The key is loaded by the DA when a device is booting. In its low-level design, the DA has required the ability to read SD cards (FAT32 format). Xilinx’s LibXil fat file system (FFS) library consists of a file system and a glue layer, which is providing APIs to access the FAT32 SD cards.
The LibXil fat file system library provided files:
1/* SD Card Required Files. */ 2#include "xsdps.h" 3#include "ff.h" 4#include "xil_cache.h"
DaReadSDFile
We designed the function of reading SD Cards. This function tries to read or write the passed in file name to or from the SD cards.
1bool DaReadSDFile(char* file, char *buffer, size_t *len, u8 access);
Parameters:
file (in): The name of the file that needs to get opened.
buffer (out): The array of the read data.
len (in-out): The array size in bytes of the buffer, meanwhile, out the size of the output buffer.
access (in): The type of access required.
Note:
The access list in ff.h of LibXil fat file system library.
1/* File access mode and open method flags (3rd argument of f_open) */ 2#define FA_READ 0x01 3#define FA_WRITE 0x02 4#define FA_OPEN_EXISTING 0x00 5#define FA_CREATE_NEW 0x04 6#define FA_CREATE_ALWAYS 0x08 7#define FA_OPEN_ALWAYS 0x10 8#define FA_OPEN_APPEND 0x30
Returns:
True if the file was read or written. False otherwise.
2.2.2 The PUF key operations
The key in the SD card is encrypted using the PUF key, so we should decrypt it with the same PUF key.
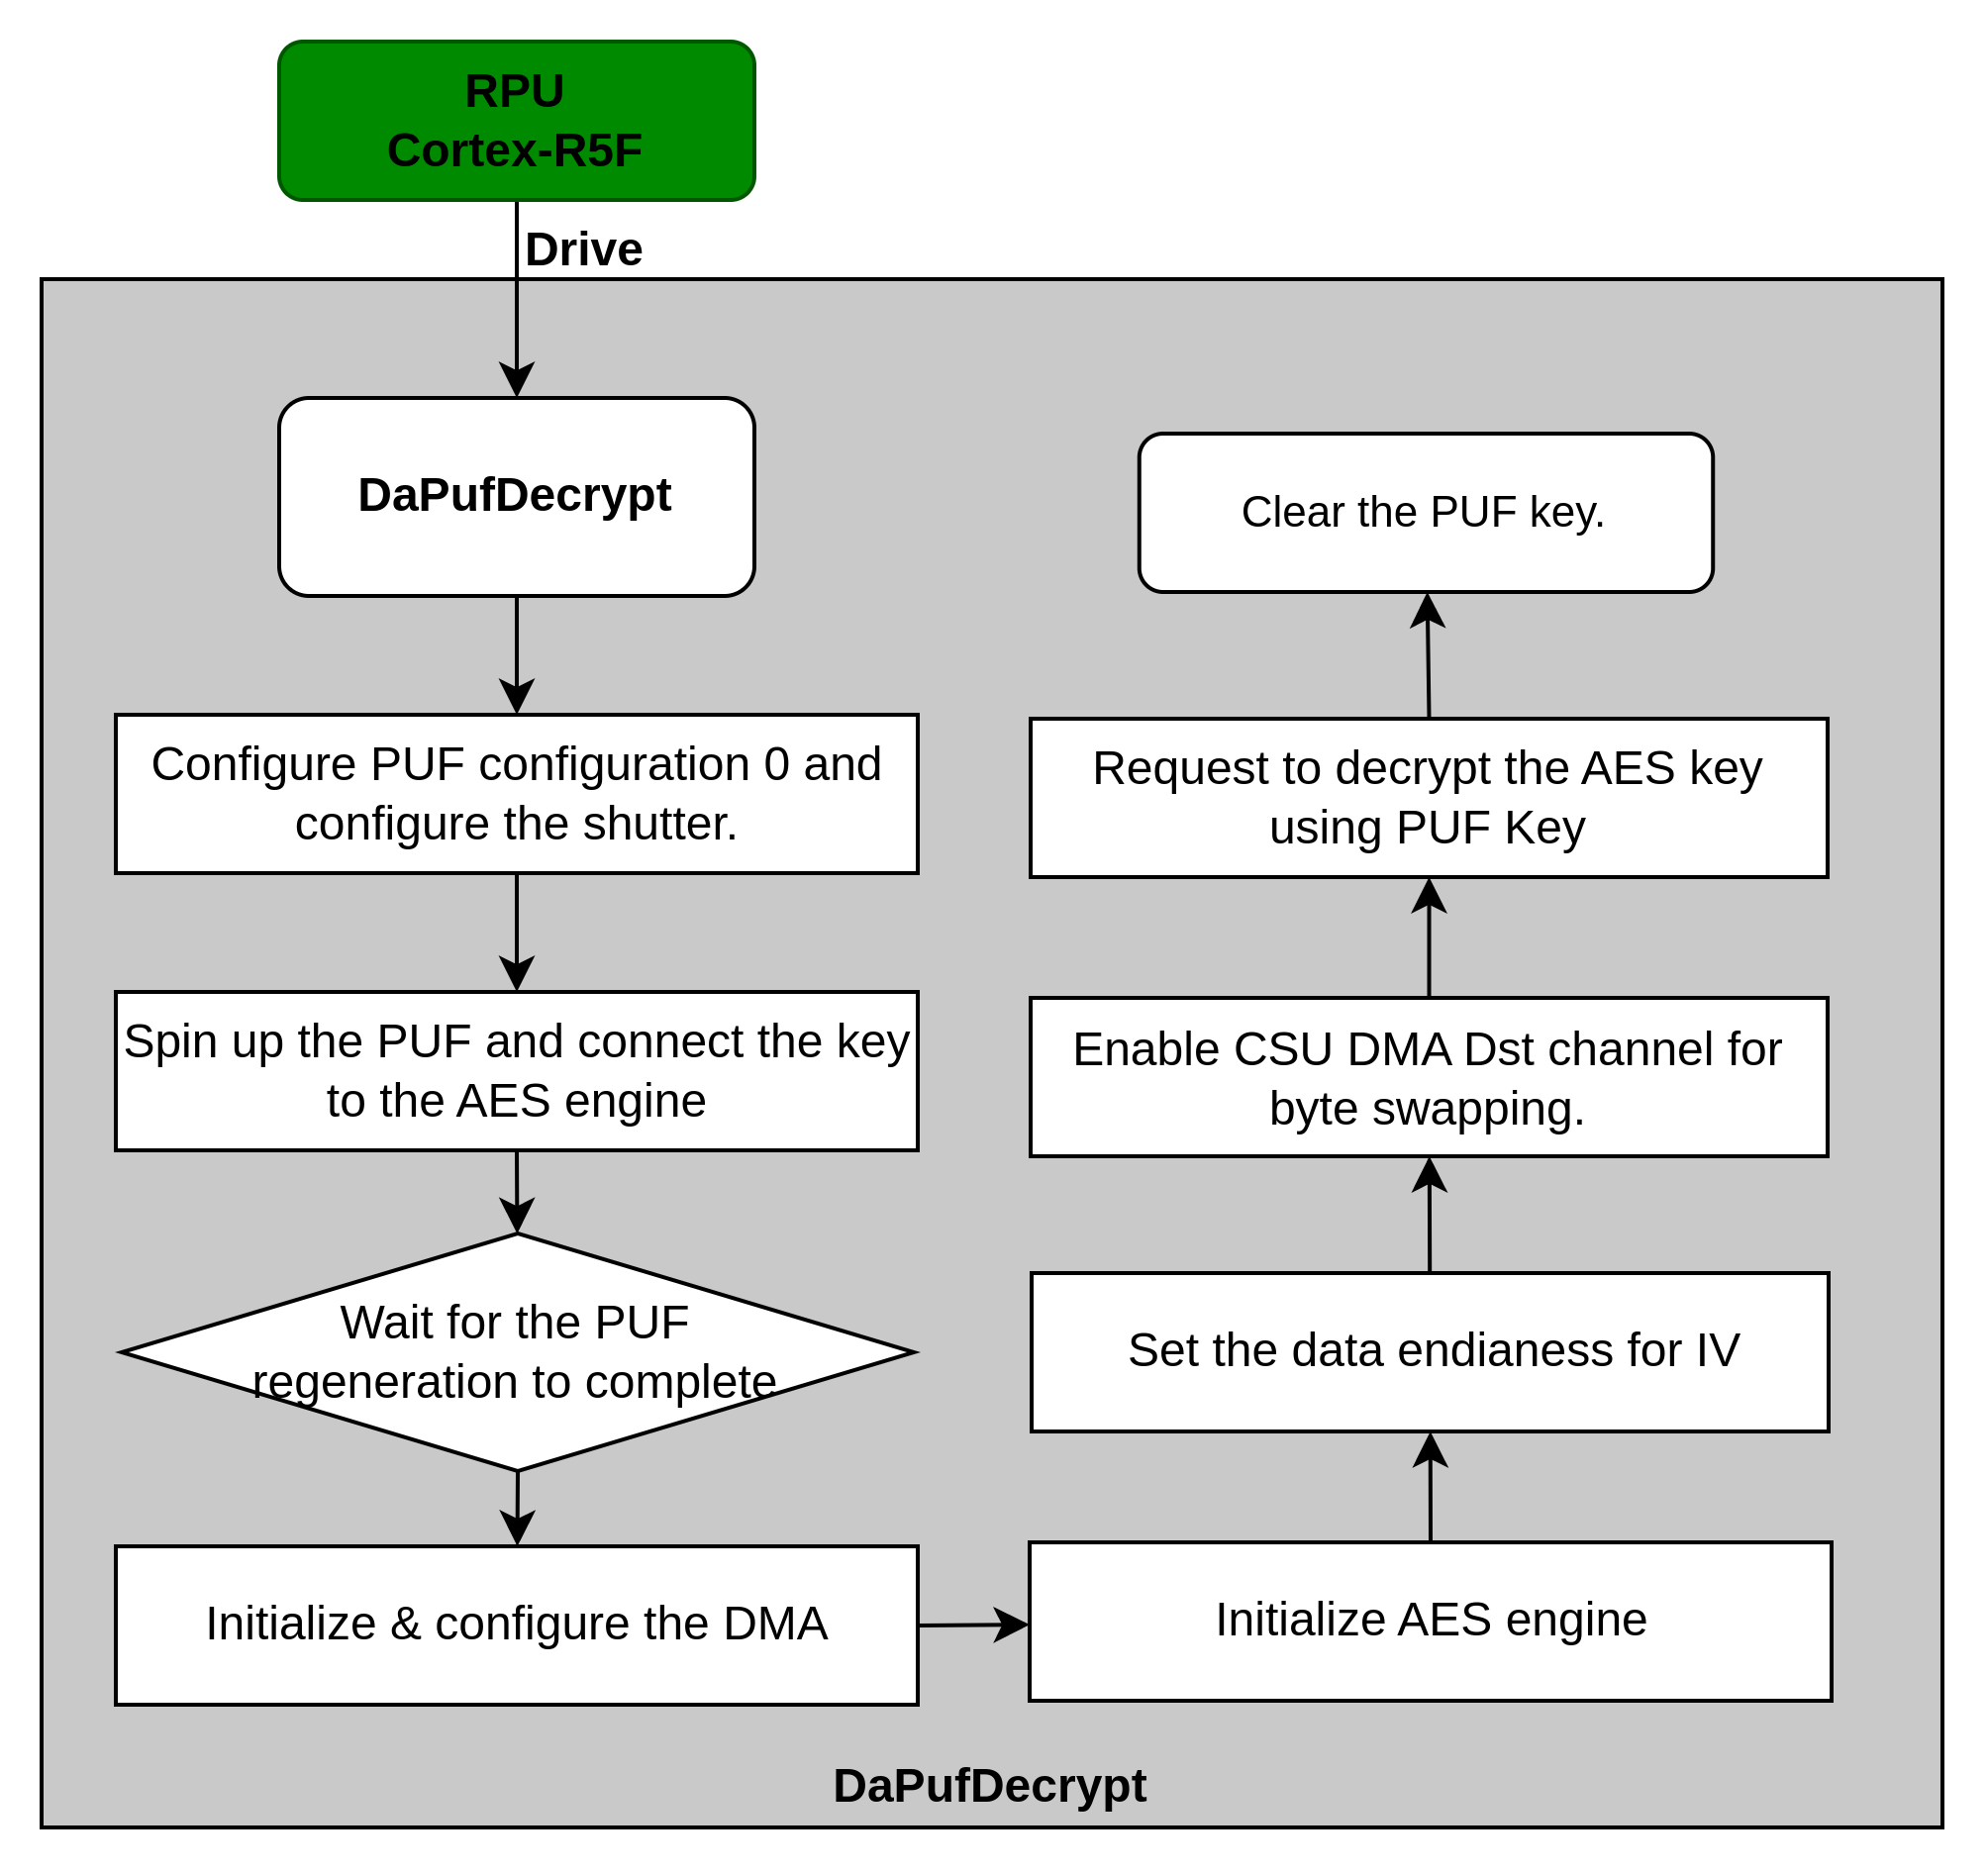
We designed the function of the PUF key operations:
1s32 DaPufDecrypt(u8 *Iv, u8 *Dst, u8 *Src, u32 Size, u8 *GcmTagPtr)
Parameters:
Iv (in): The black key iv.
Dst (out): The array of the decryption buffer.
Src (in): The array of the encryption buffer.
Size (in): The array size in bytes of the buffer.
GcmTagPtr (out): The result of GCM tag output.
Returns:
XST_SUCCESS on success;
Otherwise, the status values are defined in the
xstatus.hin Xilinx’s BSP.
The whole decryption process can refer to [ZYNQ] Encrypt external files based on file system using PUF key
2.2.3 Decrypting the Linux kernel
Zynq UltraScale+ MPSoCs has a 256-bit AES-GCM hardware engine that supports the confidentiality of boot images, and can also be used by our post-boot to encrypt and decrypt your data. We can leverage the hardware engine to accelerate our decrypting process. For more information on the AES-GCM hardware engine, see Zynq UltraScale+ Device Technical Reference Manual (UG1085).
We utilize the AES-GCM hardware engine to decrypt a partition, then place the decrypted partition in DRAM. The encrypted image must be loaded at 0x04000000. The decrypted result will be loaded at 0x04000000. The flow diagram is shown as follows:
We designed the function of the decrypting operation as follows:
1s32 SecureAesDecPartition(u8 *CsuKey, u8 *CsuIv)
Parameters:
CsuKey (in): The address of the key for decryption, in case user given key is being used it will be loaded in KUP before decryption. (32 bytes)
CsuIv (in): The address of the iv used for decryption secure header and block 0 (16 bytes).
Returns:
XST_SUCCESS on success;
Otherwise, the status values are defined in the
xstatus.hin Xilinx’s BSP.
The XilSecure library provides APIs to access hardened cryptography engines. We can find APIs in "xsecure_aes.h".
Note, the key source of the partition encryption shall be the kup_key that is defined as the user key in the bootgen tool. For the decryption theory, see [ZYNQ] Loading an Encrypted Linux kernel at U-Boot with a KUP Key.
2.3 Importing the VITIS Project
This section will describe how to import the VITIS project for decrypt_agent.
Launch Vitis and create a platform project:

2.3.1 New hardware platform file
Click File > New > Platform Project to create platform project using ZCU102 Vivado Xilinx Shell Archive (XSA).

Enter the project name as hw_platform, when the New Platform Project dialog box opens as shown in Figure 2. Click Next

Browse and select zcu102.xsa from the Vitis installation folder. To create the platform based on your selection, the tool automatically selects the appropriate operating system and processor.

Choose Create from hardware specification (XSA) in the Platform Project dialog box, and click Next.

Click Finish to create your platform project. The platform project editor opens as shown in Figure 5.

Right-click hw_platform and select Platform Build >Project to build the hardware platform. When the platform is generated, the dialog box shows the status of platform generation and the Board Support Package settings dialog box opens.
Select Board Support Package under psu_cortexr5_0. The Board Support Package opens as shown in Figure 6


2.3.2 New decrypt agent software project


2.3.3 Cloning the source code to VITIS IDE
Get the location on the method of the figure.
Then get the all the source code https://github.com/carloscn/zynq_device/tree/master/dec_agent

2.3.4 Building project
Press the build button and then the decrypt_agent.elf is created by the VITIS IDE.

Copy the decrypt_agent.elf to the path in the following figure, then rename it to dec_agent.elf

The boot_gen_image.sh will populate the dec_agent.elf to the boot image.
3. Testing Decrypt Agent (DA)
The following figure shows the smoking test of the DA. The DA will decrypt the KUP key using the PUF key. Then decrypt the Linux Kernel using the KUP key.

The decrypted Linux Kernel can be booted by the u-boot normally.

Terms and Abbreviations
Item
Description
DA
Decrypt Agent
DRAM
It is same to DDR in this wiki. DDR SDRAM
BBRAM
battery-backed RAM. Refer to Xilinx Customer Community
eFUSE
Refer to eFuse
FSBL
First stage boot loader.
bootgen
The xilinx boot images signing tool. GitHub - Xilinx/bootgen: bootgen source code
provisioning
The process of writing secure boot credentials to eFUSE or BBRAM.
APU
The Application Process Unit of ARM CPU, refer in particular to Cortex-A53.Documentation Portal
RPU
The Real-time Process Unit of ARM CPU, refer in particular to Cortex-R5F.Documentation Portal
OCM
On-chip RAM.
BSP
Board Support Package, Board support package
最后更新于