> For the complete documentation index, see [llms.txt](https://carloss-organization-4.gitbook.io/tech/llms.txt). Markdown versions of documentation pages are available by appending `.md` to page URLs; this page is available as [Markdown](https://carloss-organization-4.gitbook.io/tech/design/provisioning/x-shield-module-of-the-embedded-boards-initialization.md).
# \[X-Shield] Module of the Embedded Boards initialization
## 1. Overview
The Embedded Boards initialization (EBIM) is a module of the X-Shield. It is used for initializing the embedded board containing the embedded board initialization, firmware updating by “one-key“. It is the GUI tool running on the Windows and Ubuntu systems. Now the board platforms can be supported as follows:
* [xilinx-zynq](https://autoxai.atlassian.net/wiki/spaces/SEC/pages/1983842083/ZYNQ+Introduction+to+ZYNQ+Series+Documents)
* [nxp-s32g](https://autoxai.atlassian.net/wiki/spaces/SEC/pages/1923055625/S32G+Safe+and+Secure+features+and+their+applications)
* nxp-layerscape
The repo is
## 1. The EBIM High-Level Design
### 1.1 Firmware updating ways
For embedded devices, there are usually two ways to save the firmware (boot image, boot script, Linux kernel, Linux rootfs, ramdisk etc):
* Using the SD way;
* Using the onboard FLASH or eMMC.
#### 1.1.1 SD method
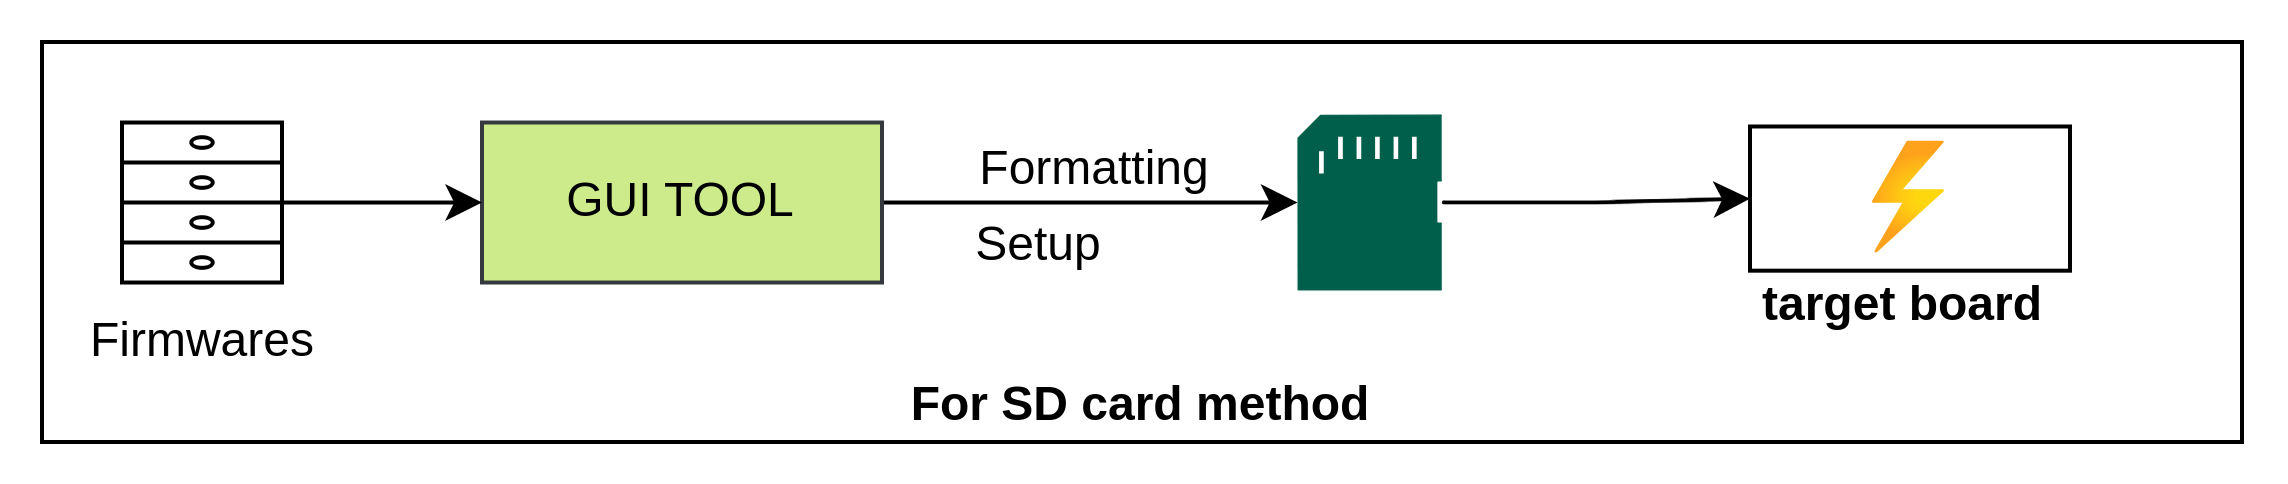
Many boards select the SD card as the firmware storage. According to the Xilinx zynq and NXP s32g booting rules, the zynq, s32g, and layerscape can be booted from an SD card. The function of the EBIM GUI tool is shown in the following figure:
The Xilinx provides a way to burn the boot image to onboard flash using the JTAG:
### 1.2 Architecture design
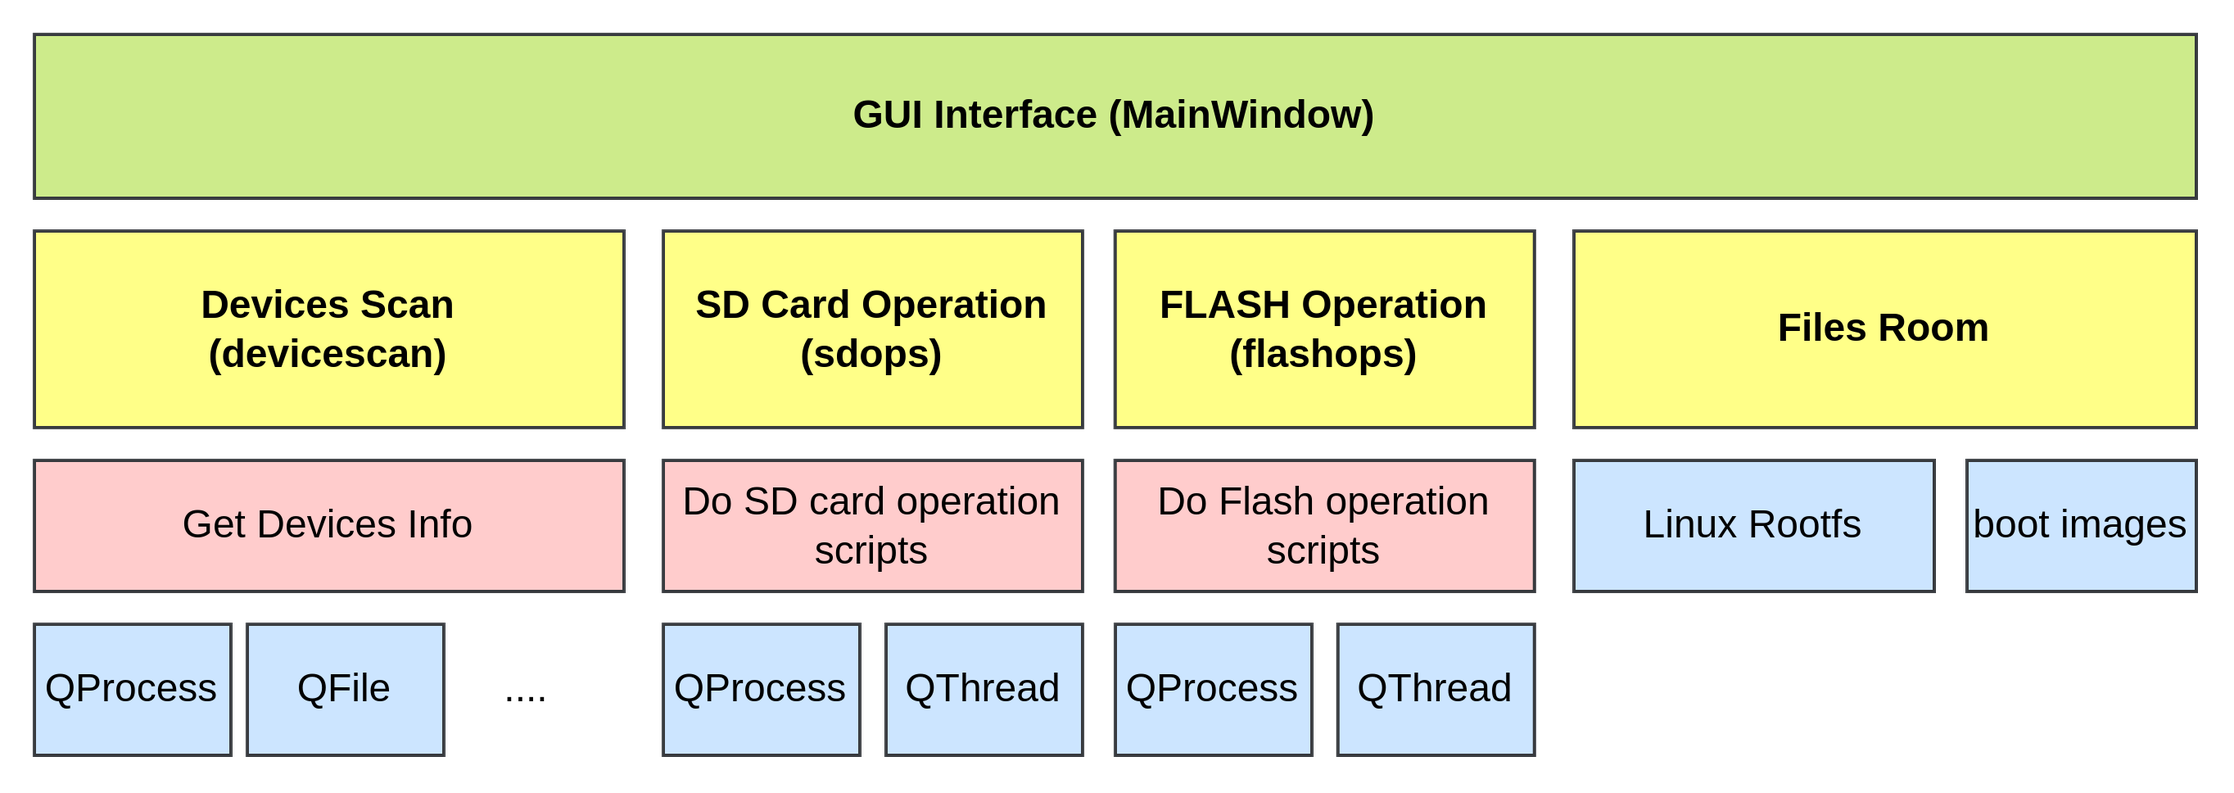
The EBIM is a GUI app for Windows OS and Ubuntu OS basing the [Qt framework](https://autoxai.atlassian.net/wiki/spaces/SEC/pages/2004616466/X-Shield+Walking+through+the+X-Shield#3.1-Qt). There are 4 classes for the EBIM and the 4 classes are dispatched by the `MainWindow` (The `MainWindow` class is the GUI class defined by the Qt framework), which contains the device scanning, the sd card operations, the flash operations, and files management. The class architecture is shown in the following figure:
Note, the name of the prefixed with the 'Q' Class is offered by the Qt framework. The figure only lists the main Qxxx class. The [QProcess](https://doc.qt.io/qt-5/qprocess.html) class is used to start external programs and to communicate with them. We make use of the QProcess to execute the external scripts. [QThread](https://doc.qt.io/qt-5/qthread.html) class provides a platform-independent way to manage threads. We declare the `sdops` and `flashops` as threads independent of MainWindow. The EBIM also calls various other Qt classes, including QFile, QMutex, QString, QByteArray, etc. in addition to QProcess and QThread. please refer to the EBIM code and Qt API document
The functions of the EBIM contain the following:
* The class Device Scan: Identify and scan available devices and return device information. The device information will be inserted into the MainWindow `DeviceList`.
* The class SD card Operations: Responsible for executing scripts about SD card operations that contain the sd card formatting, the making filesystem for the sd card, and copying the files to the SD card.
* The class FLASH Operations: Responsible for executing the scripts about flash operations that contain flash initialization and flash writing.
### 1.3 Function diagram
The succinct UML figure is shown in the following figure. For detailed UML block, please refer to the corresponding low-level design.
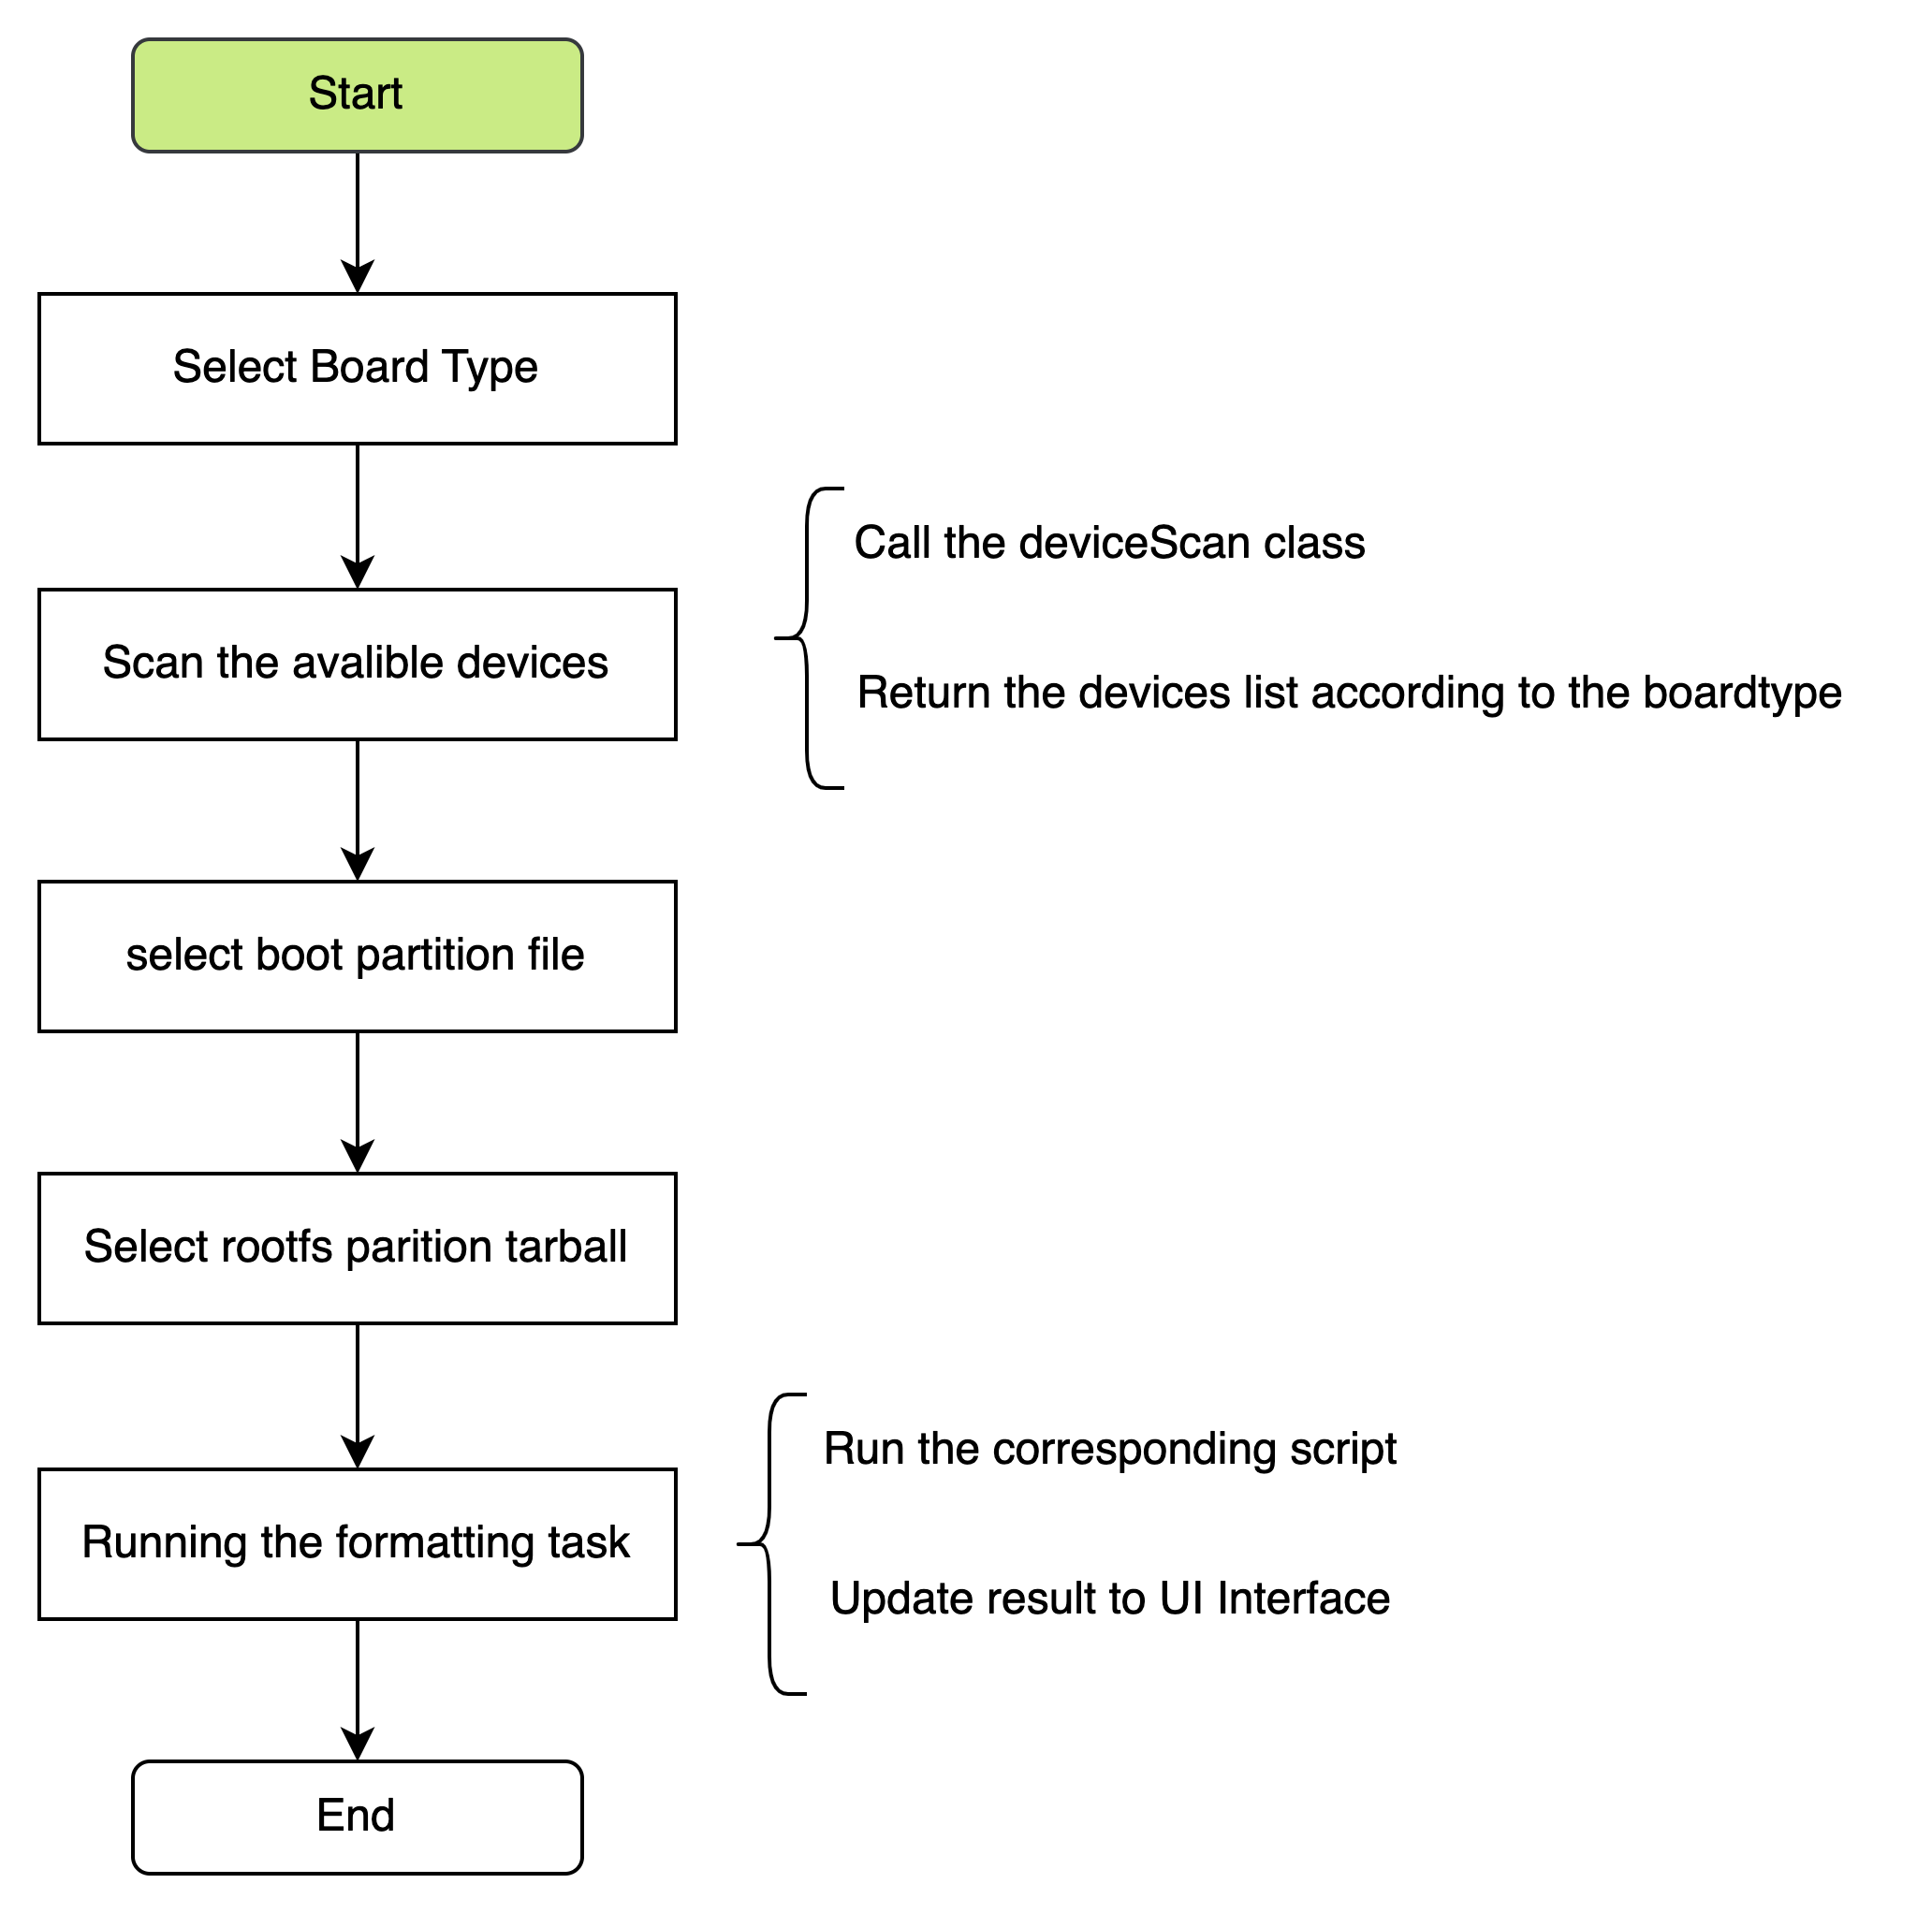
aIn the nutshell, the EBIM will list all the available devices and run the corresponding scripts. The really touching and operating of the device is programmed in the bash/bat script. The following figure shows the task flow of the EBIM.
### 1.4 The UI Design
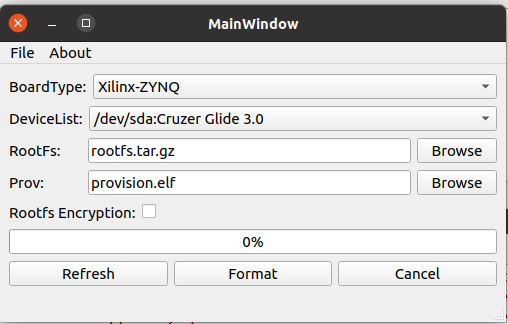
The following screenshot is the GUI design of the EBIM:
## 2. The EBIM Low-Level Design
The functions of the EBIM contain the following:
* The class Device Scan
* The class SD card Operations
* The class FLASH Operations
### 2.1 The class of Device Scan
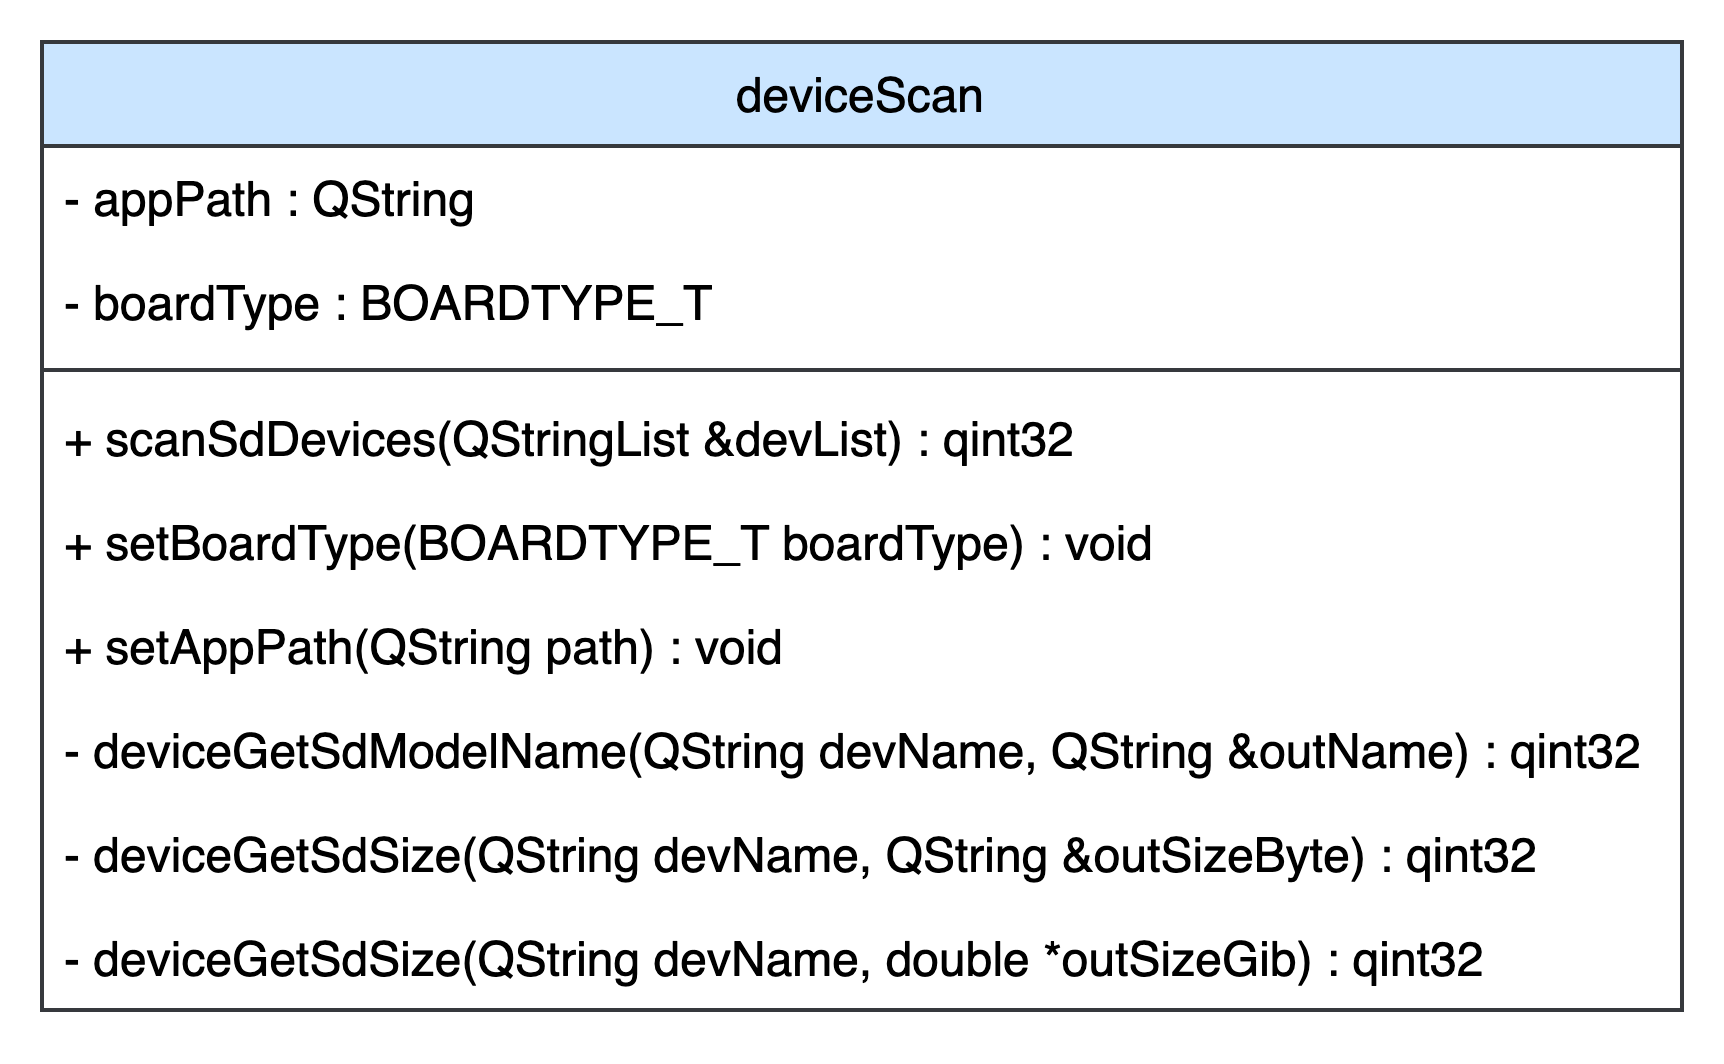
The class of Device Scan is to list all available devices that are connected to the host. The UML figure of the Device Scan is shown in the following figure:
#### 2.1.1 SD devices
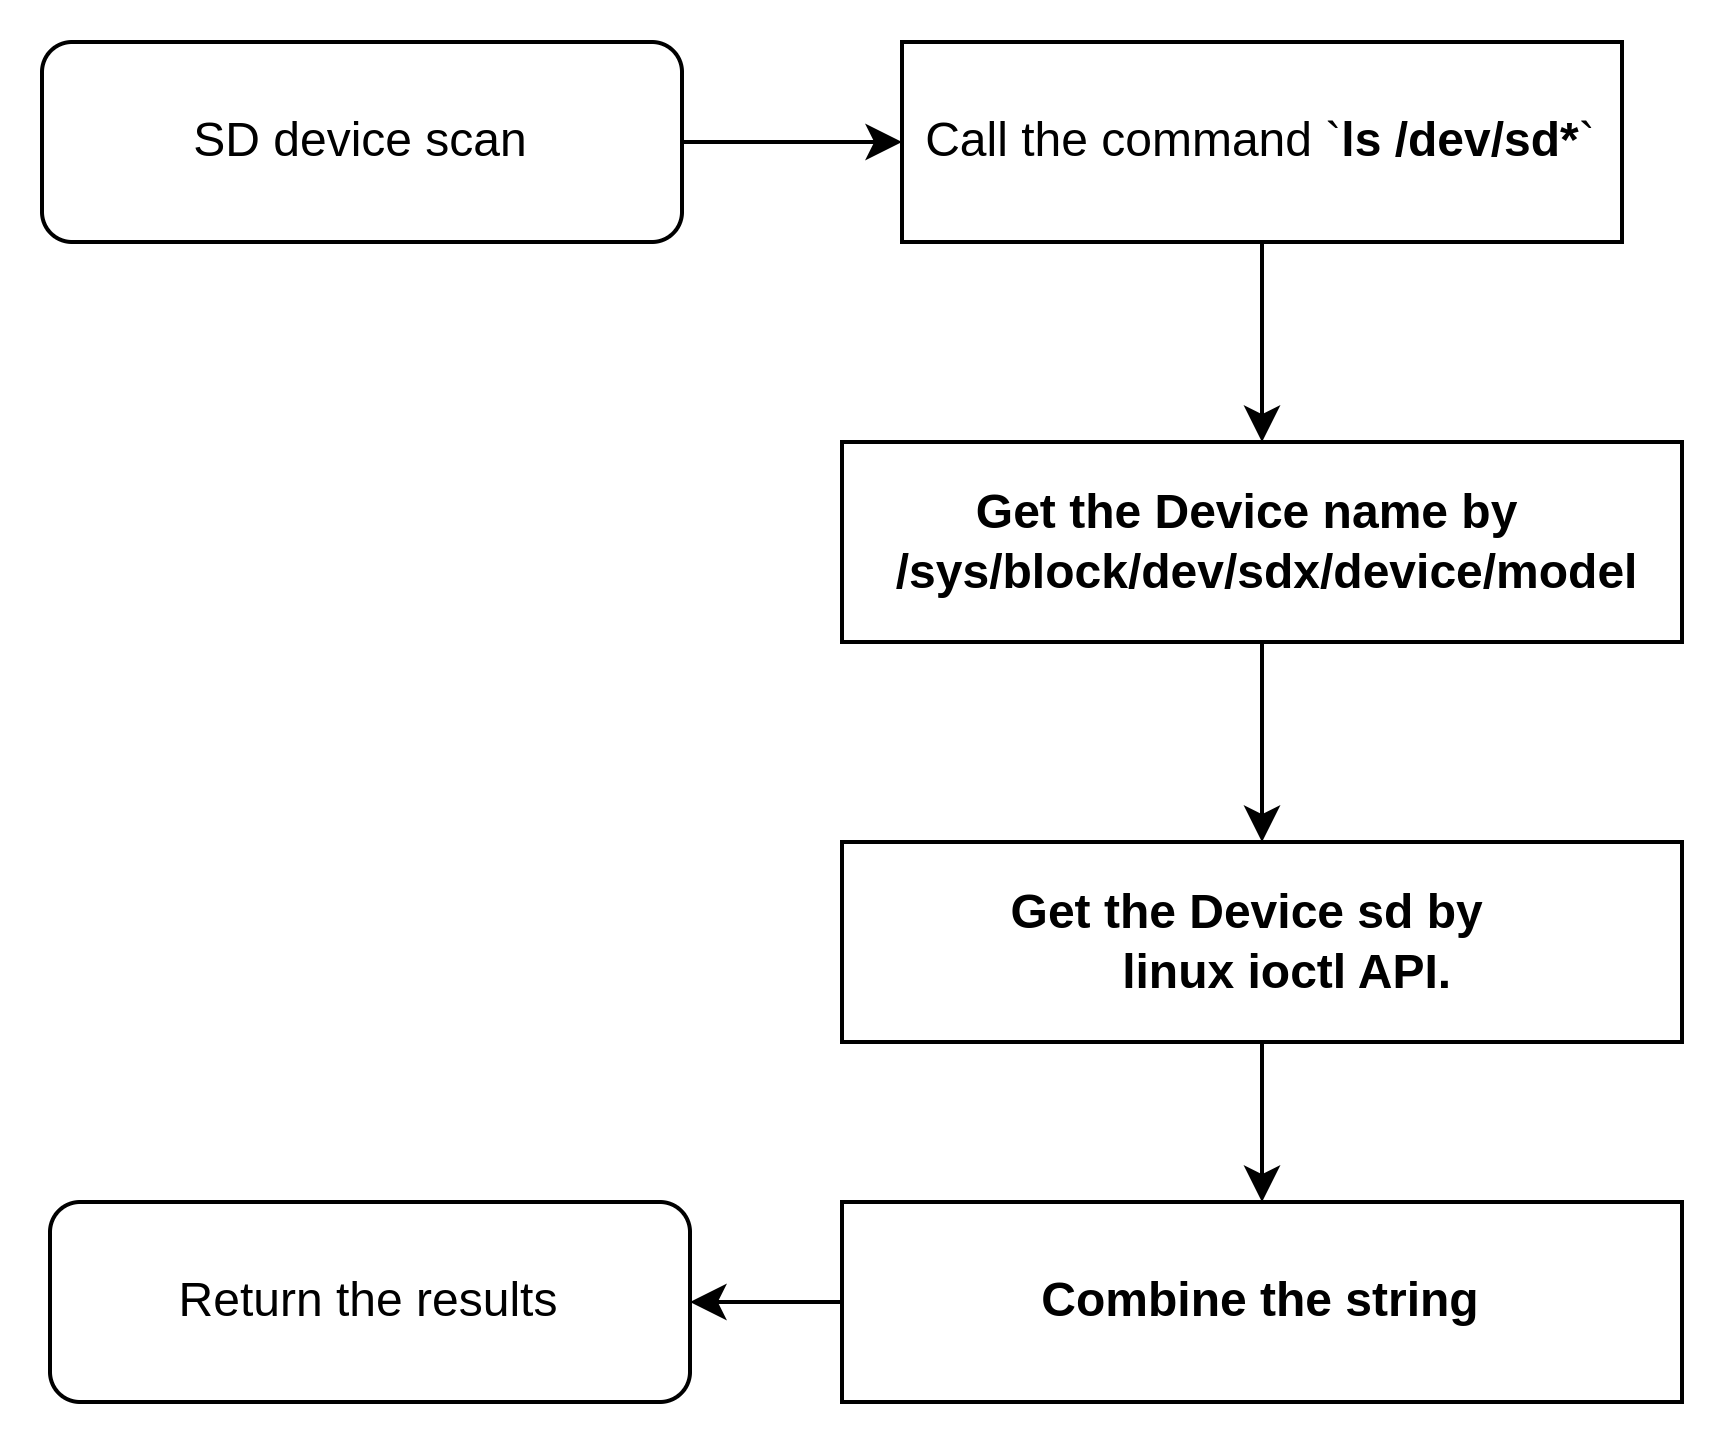
For the Linux Device, the SD device list can be listed by `ll /dev/sd*`, and the corresponding model name is stored in the `/sys/block/dev/sdx/device/model`. Moreover, the size of the device can be obtained by Linux ioctl API. Finally, combine all the information, and return them.
or the Window Device, `wmic diskdrive get name,interfacetype,size,model` command can help us to get the disk information. The information is shown in the following figure:
The EBIM just extracts devices by the `InterfaceType` 'USB', the size and model name can be obtained.
#### 2.1.1 JTAG devices
For the burning flash devices, we need to get the information from the JTAG driver.
Reserve the interface, and add the module when necessary.
### 2.2 The class of Sd Operation
The class of the Sd Operation is to format the target available device that is inserted into the host. The UML figure of the Sd Operation is shown in the following figure:
#### 2.2.1 Tarball mode
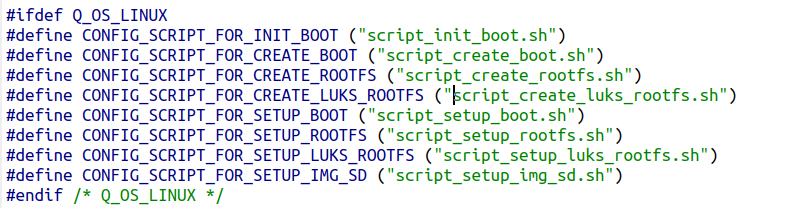
The tarball mode will recognize that the input file is a tar.gz file, and divide the task into five steps. The SD operation uses a series of scripts to finish the task. The developer shall add his scripts to the corresponding folder. The SD operation class will call it automatically.
The scripts are listed in the following figure:
#### 2.2.2 img mode
The img mode will recognize that the input file is an img format file and only run one step. The script will use the `dd` command to burn the img to the SD card. This mode will burn for a long time.
### 2.3 The class of Flash Operation
Reserve the interface, and add the module when necessary.